The Eternaglo Plus comes with a couple of GPIO terminals that can be used to add accessories. However, different accessories require different input configurations, so in order to maintain flexibility with various types of accessories, the GPIO terminals on the Plus are left, in simple terms, as generic GPIO connections, not designed for one specific accessory or another.
Buttons (and other similar accessories like PIR sensors), require something called a pull-up resistor, which basically allows WLED to know that a specific GPIO is in a “high state” (receiving voltage, ~3.3V-5V). Since the IO terminals are designed to be as flexible as possible, they don’t have the pull-up resistor built in. However, it’s very simple to add. In order to easily use a button or other similar accessory with the Plus, simply connect a small resistor (~10KΩ) in between the GPIO number you plan on using and the 5V accessory power terminal. These resistors are extremely cheap and available on any online marketplace, including Amazon. This will allow WLED to see that the GPIO is in a high state, making adding a button possible.
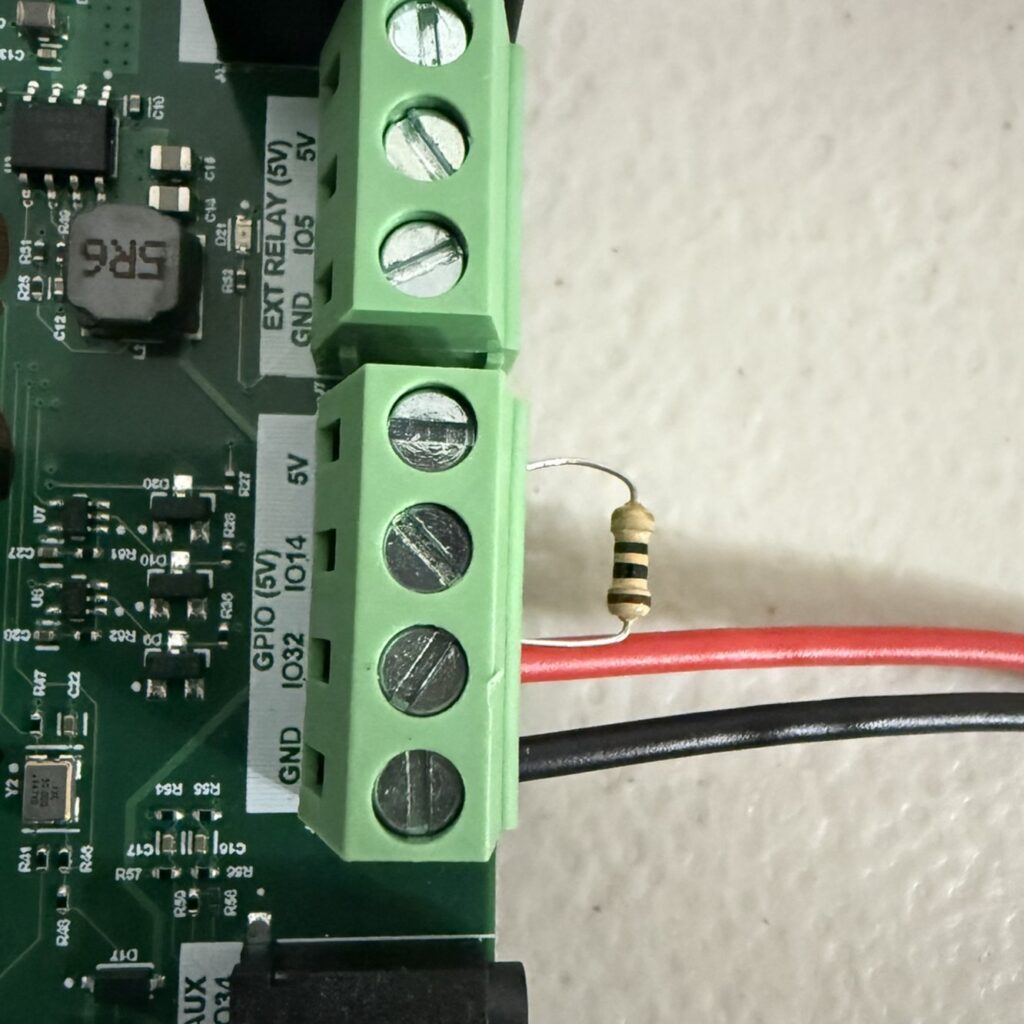
Here’s a photo of a configuration for a simple push button to be used with IO32. The 10KΩ resistor is connected from 5V to IO32, and the two wires for the push button are connected to IO32 and GND. The polarity (direction) of the resistor does not matter in this case.
Now that your button is physically connected to the board, you must configure its behaviors in WLED. In the Config, in the LED Preferences, there is a section under the LED strip configuration for setting up a button. For this example you would choose one of the buttons from 0-3, choose the GPIO number, then set the type to “Pushbutton”. Please note that the default behavior of the buttons depends on the button number you choose.
Button 0
- Short press: toggles lights on/off
- Long press: changes color randomly
- Hold for 6+ seconds: resets the wifi settings
- Hold for 12+ seconds: erase settings and presets (so be careful!)
Buttons 1-3
- Short press: cycle effect
- Long press: ramp brightness
- Double press: Cycle pallette
If you like, you can change the default behaviors of the buttons by navigating through Config to Time and Macros, then scrolling down to button actions. Here, you can set the button to trigger different presets or playlists with a short press, long press, or double press.
You may also configure a preset that uses API commands to perform advanced actions, so that your button becomes much more versatile than with the out-of-the-box functionality. For more information, read here.